Wednesday 20 October 2010

Experiments with 3D max and Primitive shapes

Today While waiting for the lesson to begin i opened 3Dmax to have a look at the interface and try to use it with help. this was a very good idea because it means that i will practice 3Dmax for later use in the year.
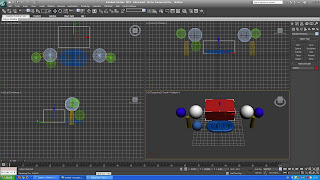
i decided to use only primitive shapes in Max because i havent looked at molding shapes into my own shapes yet. I only used a Torus, Sphere, Box, Cylinder.
After gathering these shapes i started putting them into posistions not having a shape that i actaully wanted to create as an end image however i kept moving and experimenting and eventually came up with a final Robot like face cartoon that i happen to like. i feel i would like to experiment with 3Dmax more however i would also like to be shown the basics of molding and creating my own shapes not just moving primitive ones into a shape or a piece.

Tuesday 19 October 2010

Texture imputting on Text with back drop

I decided after making the word that i put texture onto that i would create a relevant backdrop using the skills i had learnt to make the wall earlier. therefore creating a nice image. altho after making it i noticed that it didnt look right without the lighting being in the right place therefore i used a spot light tool that i had experimented with while getting to grips with the tools of 3D max. After positioning the spotlight i found another thing about my image that could be improves and it was that the word didnt look seperate from the background due to it having no shadow casting onto the back ground there i went into light settings and activated light shadowing.
This is the image i have ended with.

Texture imputting on Text

I have now Been practicing on 3D max and have use everything i have learnt today and made text 3D and put the textures that i wanted onto the letters. Then using the skills i learnt this morning and rotated and moved the word into a position that i liked and wanted.


Overall Today i feel that 3D max is a programm that i can really get to grip's with and prefer to photoshop and so i think when we get our own projects to do i would probaly find more uses for 3D max because i feel i can produce a better outcome.

Texture Imputing

After the lunch break we logged back into 3D max to put Textures onto a wall. This was done by going into material editer and importing a picture of texture that we had selected from the internet for the demo.

3D max intro to editting Polygons

Editting polygons was a very simple to to grasp once we had the demo. you create a shape and then right click the shape and convert to a edittable poly that way you can click seperate parts of the shape and mold them and change them completely seperately to the whole shape this way giving you the abilitiy to change the shape into something completely different from the begining shape.
This is proven within my Shape because i started with a simple Tube shape and have just changed shapes to create a shape that reminds me of a water tower shape.

3D Max introduction of simple text

Today we Covered the very basic's of 3D max in the form of making a text and rotating, Scaleing, Moving and then making it the Text 3D and exporting it into Photoshop and placing it in an image of our choice
This image is of me making basic shapes and playing with the moving and rotation tools


We then Made a piece of text on max and use any words we wanted and then we exported to photoshop and i also decided to put a rendering onto my Text in the form of Chorme effect to my text to make it less standard and more orignal to my style not just the demo we did.


Monday 18 October 2010

Sound Recorder introduction

Today we had a introduction  into using the sound recording equipment and learning how to use a Gun Mic with a Marantz. which meant that we learnt how to set it up into a preset for indoor and outdoor recording. we also learnt how to formatt the memory cards before and after use to make sure that no other students can use my work. we learnt how to set up the recorder to record MP3 formatt because its the smallest and simplest setting to record.
we also learnt the names for different types of mic.
Directional Mic = a mic that only picks up sound in the direction you are pointing the recieving end
Omnidirectional Mic= a mic that picks up all sound around it in an arc therefore picking up background noise that you could other wise not want.

Wednesday 13 October 2010

Personal ID Poster Lesson

We Were given a Brief to make a poster with Photoshop with my name date of birth. we could only use Blakc and White images but we could use scanners or any technolgy to get things into our poster.
i made a poster using a picture of my arm and a picture of my T-Shirt. I made my name out of a dot a paint for each letter and using the smudge tool into the shape i wanted. i then Create paths using the pen to place all my Text into a shape i want. i Really enjoyed this lesson it was fun to try messing with filters.

Tuesday 12 October 2010

Graffiti Forms

Today i researched Graffiti in a Group and i was given the task of research Forms of Graffiti
Tag Style
Tag style is the most basic and quickest form of graffiti writing. It is usually a representation of the artists name and is used as a way to gain recognition by being seen in a lot of places and as a signature for larger pieces.
Throw-Up
This style is another quick method of graffiti writing. It is done by making a layer of paint in one colour and a quick outline of the letters in another.

Blockbuster

Blockbuster letters are evenly spaced and not too difficult to read. They are just what the name implies, block letters. This style is often done on large areas such as whole train cars

Wild Style

This style is much more complex than any of the previously mentioned. The letters are very blended and highly decorated. This type of writing can be very difficult to decipher.
Stencils
Graffiti stencils are used to paint usually monochromatic text or images quickly and repeatedly on multiple types of surfaces. Because these stencils are usually used repeatedly, they should be made out of somewhat sturdy material to make them reusable and easy to clean. They should be able to stand up under multiple layers of paint

Monday 11 October 2010

Street Art Video

We watched a Street art documentary which included amazing artist such as Invader and Banksy this was a very helpful video it opens your eyes to the world of Street art which other wise can be a very elusive style of art. The video is a very eye catching thing in almost every shot theres things to listen to or see it really drags you into the film and inspires you just by seeing how you could work with enough desire to work you can pretty much create anything you can imagine using your inviroment. The way the Artist created the work shows a tradition background using stencils to help your work evolve into larger pieces. I Like the way each artist in the video has his own signature mark to place onto the world and put into the view of the public. the scale of danger they can through just to pull off there art work is a sign of pure passion and dedication.

Poster

Last Week we Took a trip down to a local park and took some picture's of various things i picked out the picture of billy actually falling off a bar but he landed safety and looked very interesting in ways he is postioned. I then used a filter to change the image into a very cool looking poster background and so i used the glowing edges filter because i thought it gave the image the best look. i then simply added a Pen Tool path and connected the text to it.

Wednesday 6 October 2010

Putting Text of Images

After doin the demos with the class i used what i had learned to put text into and image of my face. but first i had to take the image and put it into greyscale first. Then i put a filter on it to make it cutout filter. i then made a path using magic wand and put text in the path.

Texting Following Pen Paths

We Also used the pen tool too create wavey lines to creat a path for the text to follow. this was soo much easier to get your desired shape because you can customise the path.You dont Distort the text.

Text warping

Today we used the Text warping tool to create Text and making it follow a path to shape it into images in the long run. This was i usefull tool to learn because it allows me to grasp how the work i looked at this morning from David Carson and other work that i was shown on Moodle.

Typography Examples


these pictures are amazing they are done in such a good way and its also a completely new style that i have never seen it before so it inspires me

David Carson Typography Designer

David Carson is a typography Designer and is very well known in the world for his amazing art work. His unique style has been called illegible. Rules of design are constantly and consistently broken in Carson's work. He would let typed lines run into each other, cross gutters, or be upside-down. He would layer type and image until neither was distinguishable on the page and even continued an article on the front cover of a magazine. Carson has never believed that one must first know the rules in order to break them.
With only a single class as training, he became art director for Transworld Skateboarding. He immediately found praise and a sort of cult following; however, some advertisers were not willing to support his radical approach. Beach Culture was under the direction of Carson for three years until it ceased publication due to a lack of advertising. Under his direction, Beach Culture won over 150 awards, including "Best Overall Design". Carson is most well known for his work art directing
the magazine Ray Gun. His design ideas were incorporated completely with the magazine. The publication had no consistent typefaces or layouts; even the masthead was recreated for each issue. The result was a magazine that was strikingly fresh looking with every issue.
Tuesday 5 October 2010

Investigation into Observational Drawing

Observation is perhaps one of the best forms of seeing to create art, it is the important process of seeing a real life scene or subject of interest of which you want to capture and translating that scene onto a piece of paper or canvas for painting. Observational drawing is very important if you want to learn how to see and get all of the proportions of everything you see into scale.

Capture

Three methods of Capture i will be using for the Park trip will be a Picture from my phone and a Video and then i will use Observational Drawing to Draw images i see from the Park.

We have also Made Mind maps on types of Capture that we know and what they were used for